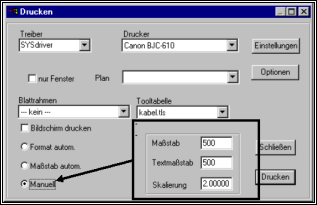
To the expression of plans Moskito offers you a huge number of possibilities. On clicking the badge of the tool box or the choice of Datei|Drucken from the menu strip appears the suitable dialogue window:
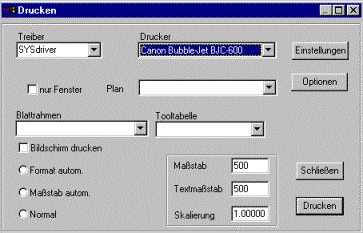
While opening she already contains the topical settings for driver and printer which you can change - if necessary - by choice of other settings from the accompanying list fields.
Beside the driver and the printer or plotter you select in the dialogue window from the list field Sheet frame the desired frame with stamp or legend.
In the list field Tool table you determine the colour arrangement on the expression of the plan cutting.
For the choice which plan cutting should be printed three different variations are possible:
1. By the choice of screen print you spend the topical screen contents.
2. They can print by the choice of only window a part of the topical screen contents which you determine in the following closer.
3. By information of the plan name you print a complete plan. You select the desired plan name in addition from the list field Plan. Now all topically loaded plans within the plan borders of the well-chosen plan are printed. The given plan name is automatically put down on the stamp of the sheet frame.
The variations Screen print and only window exclude themselves mutually. You can print the third variation Plan with screen or connect only window. Then the contents of the graphics window are printed or parts of it, but, in addition, appears in the stamp of the sheet frame in the list field Plan given plan name. They can award beside the augwählbaren plan name of the list also an individual plan name, simply while you give him over the keyboard in the field. Every entry which stands while releasing the pressure in the list field Plan is performed in the stamp.
In the lower part of the dialogue window you can give other settings for the expression. By the fields Format automatically, graduation automatically or By hand you fix the size of the plan and the plan elements. If none of three fields seems in the dialogue window well-chosen, the setting is valid By hand.
Choose the setting Format automatically, the given plan cutting is printed in the graduation which is performed in the suitable field Graduation. The information station automatically determines for graduation and plan cutting suitable sheet format. This setting makes sense for printer or plotter which own several shafts for different sheet formats.
The setting graduation is automatically interesting for printer or plotter with only one paper shaft. The elective plan cutting is so scaled that he fits on the sheet size supported by the printer.
With the choice from those settings which you have met in the fields Graduation, Text graduation and Skalierung are taken over By hand for the expression. The functionality of these fields is described in the suitable segment.
Pressure variation „only window“
After the choice of only window you operate first the badge printing. Then the dialogue window and depending on shuts whether you have chosen format automatically, graduation automatically or By hand, the monitor display changes.
By hand
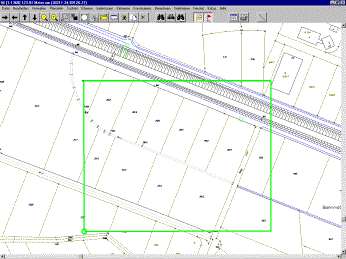
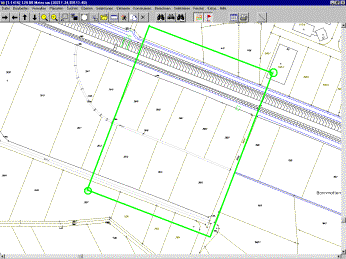
After the fastening of the dialogue window the cursor changes into a green rectangle which indicates the sheet frame. If you have given a sheet frame with inserted stamp, the stamp surface is also indicated you in green colour on the screen.
They can shift the indicated pressure area by moving the mouse. You are asked by an info box to give the centre of the desired expression and to release thereby pressure. Before you do this, you have another three possibilities to change the indicated pressure cutting. In spite of the changed cursor announcement you can serve the picture run strips and all functions of the menu and the tool box. In particular the zoom functions can be explained. For example, it is possible that you can see on the screen in spite of well-chosen sheet frame to no green boundary lines. This is always then the case when the screen cutting is substantially smaller, than the plan cutting elective for the expression. Now they can increase with the help of the available zoom functions so long the screen cutting, until the given pressure area becomes visible in the graphics window.
After a click on the middle mouse key you can turn the pressure area round his centre as long as freely, to you the second sometimes click. Moreover with a key mouse two you use at the same time them SHIFT- Key of the keyboard and the left mouse key.
Under pressure the right mouse key you receive the pop-up menu that now beside four basic functions, in addition, the functions contain demolition, graduation and corner. Here you can break off accordingly pressure, fix a new graduation or give a special rotary corner for the pressure cutting. Accordingly the indicated pressure area changes.
If you have met, finally, all necessary settings, release the print order by a click with the left mouse key.
Format or graduation automatically
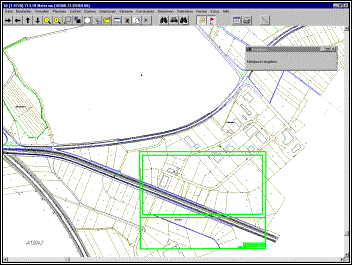
If you have automatically chosen in the dialogue window printing the field Format automatically or graduation (together with only window!), the information station expects that you fix the pressure area afterwards by the information of three points. After you have activated the badge printing, the dialogue window shuts first.
Afterwards in the graphics area the cursor appears in the form of a green corner, how in below shown. They move him by the mouse to that place in the graphics window which should appear left lower corner of the plan cutting on the expression. With a click on the left mouse key you fix this point.
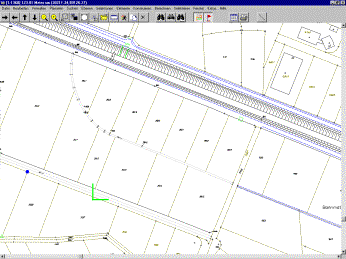
Afterwards you fix in the same way the right upper corner of the pressure area. Besides, you automatically draw up a green rectangle (see below).
You can turn this green frame stretched between both agreed corners by movements of the mouse still round the left toe.
Surround with the frame the area of the graphics window which you would like to print out and confirm the choice with the third and last click with the left mouse key. Choose at this point in the pop-up menu the order Demolition or press the <Return >key, receive an expression parallel to the screen edge.
Pressure variation „Screen print“
With this function you simply print out the whole screen contents. After the activation of the badge printing no other queries occur, the expression is released immediately.
Also with this pressure variation you can select sheet frame and tool table as well as a plan name which should appear in the stamp.
Furthermore you can also choose here between format automatically, graduation automatically or By hand.
With the choice of automatic format or graduation appears precisely the visible screen area on the expression.
With the setting By hand against it are used in graduation, text graduation and Skalierung to given dimensions for the expression. In this case that plan area which would be visible with the elective settings at the screen middle appears on the expression.
Graduation, text graduation and Skalierung
In all three pressure variations you can work with the manual settings Graduation, Text graduation and Skalierung to influence the appearance of the expression.
Three settings are always visible in the dialogue window printing. However, they are activated only if at the same time the field is selected By hand. With the choice of graduation automatically they are headlined with the values elective by the system.
Graduation
In this field the graduation with which the plan contents should be printed out is given. While opening the dialogue window appears in the original graduation accompanying to the loaded plans (in this example this is 1:500).
Text graduation
In the field Text graduation the size of the text elements on the expression is determined. Also here the original text graduation appears while opening the dialogue window in the input field. The size of the texts changes according to the given factor. Example: In the field 500 appears while opening the dialogue window. If you brag now as a text graduation in 1000, the size of all text elements doubles in the plan expression. Accordingly she halves herself with the information of 250.
Skalierung
The settings in the field Skalierung affect all elements of the expression. Here not only all plan contents with the given factor are increased or reduced, but also the sheet frame including his stamp. Thus a plan with a sheet frame can be given, for example, by the information of a Skalierung of 0.7 in the German Institute for Standardization A3 format on a German Institute for Standardization A4 sheet.
While opening the dialogue window the original graduation accompanying to the loaded plans (in the picture in each case 1:500) appears in the fields Graduation and Text graduation in each case. The field Skalierung contains in each case the last value given by the user.