As a user you receive with the store automatically write protected copies of the plans from the central data continuance. Hence, they can carry out in the central data continuance even no changes. However, in your local plan copies you can absolutely change data and keep these changes locally in your Workfile up to the next meeting. As soon as you close, however, a worked on plan, your changes get lost.
The way like an object or element in a plan is shown, is given by a firm representation model (see The representation model).
Within these representation regulations you can change all qualities of data. They can assign objects of another object class which change colour or the line form of objects.
Awarded by object keys
Five light blue shown, own low-voltage cables lie with the station Hollmuth from working example 4. We assume in the following example from the fact that has received one of these cables a wrong object key, and that it is a foreign low-voltage cable in reality. His object key should be changed accordingly.
Working example 1:
1. Maneuver first to the station Hollmuth (see working example 4).
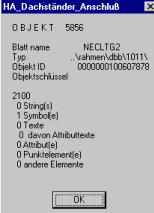
2. Select the light blue cable which lies on the left beside both red shown medium tension cables, and indicate yourselves the accompanying info box. The dialogue box is entitled with "NSP_Kabel_Eigen" and the object key of the cable is in 1400.
3. Confirm the dialogue box.
4. Activate the input line of the command window, while you with the left mouse key hineinklicken.
5. Give DOK (abbreviation for DeleteObjectKey) and you confirm with RETURN. Because an object can own several keys, the inquiry appears Key number:.
6. Give the key number of the management: IN 1400. Confirm again with RETURN.
7. Give COMPULSORY HEALTH INSURANCE SCHEME in the command line (abbreviation for AddKey). Again appears the inquiry Key number:.
8. Give the key number for foreign low-voltage pipelines: IN 1405. Confirm again with RETURN.
Result:
The representation of the cable changes from Light blue to black. Now after double click on the cable the info box indicates the title "NSP_Kabel_Fremd" and the object key "1405".
Putting in and changing of attributes
Now we assume from the fact that also the material of the management from working example 9 was wrong digitized and is known to you the actual material and the cross section of the pipelines as a NKBA 4x70. Assign, hence, to the attribute QUE of the management this value.
Working example 1:
1. Identify the cable to be worked on (see working example 9).
2. Choose the menu point Daten|Neu|Attribut in. The following dialogue box appears.

3. Give in the field Name to the desired attribute names - QUE - and in the field Value the wrong (!) attribute value NKBA4x79.
4. Click on generating and close the dialogue box.
5. The attribute QUE should get, actually, the value NYY 4x70! Change the attribute, while you the menu point Daten|Ändern|Attribut select. A similar dialogue box appears. Here you can give no new attribute names, but change only her values.
6. Change the attribute value in NKBA 4x70 and close the dialogue box.
Result:
Now with the double click on the worked on cables the new attribute appears in the info box.
Tip: They can extinguish an attribute, while you select Daten|Ändern|Attribut, and as an attribute value provide no information. Then the attribute is recognised as empty and is automatically extinguished.
Copy
On the house No. 42c a roof stand should be furnished with a private connection. In addition you must insert – whether by copying or Neuanlegen – additional graphic data in the accompanying plan. To be able to do this, the suitable plan must be opened. Switch in addition the required plan NEC850717 with the help of the dialogue window „plans switch on“; with the turning on he is automatically opened (see working example 5).
Begin with the equipment of the private connection, while you copy the roof stand symbol (see side edge) of the house No. 57. In addition the roof stand, an object with a symbol, must be copied and be shifted to a new place, to the roof of the other house.
Working example 1:
1. Doubleclick the available overhead line (e.g., between house No. 57 and house No. 55) with the middle key to receive the element information about the management. These are used in the next step to generate a new management of the same kind. Notice to yourselves the sign key which gives the colour (75), and the shading key (0).
2. To be able to work on an object, you must open it first. Identify in addition the roof stand of the house No. 57 with an easy mouse click, and open with a double click the info box. Get the info box of the roof stand, you can continue with step 5. Because at this point, however, two objects lie on top of each other - it can be the roof stand and the management - that you can identify not the roof stand, but only the management with the mouse. Obey in this case the steps 3 and 4.
3. Choose the menu point Select |Identifizieren |Objekt in. Click the roof stand again. The management or the roof stand is dyed blue and you are asked whether they wish the next object. If the roof stand is blue choose and the roof stand is opened. If the management is blue choose and the roof stand is opened.
4. You choose the control Daten|Zeige|Objekt. Now they must receive the information of the roof stand.
Confirm this box with OK to be able to go on working.
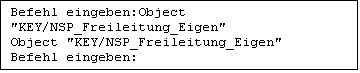
5. The object "roof stand" is automatically opened by identifying. Dialling now you the menu point Daten|Neu|Objekt in. Select in the list of the object types the first-class NSP_|NSP_Freileitung_|NSP_Freileitung_Eigen, and click on the symbol to the left of the name. An object is put on. The object is at first empty and you see only in the protocol window the following issue:
6.
|
Now the new overhead line must be still provided with a representation. Close in addition the dialogue box.
7. Open under Daten|Neu|Linienzug the dialogue box to the representation of lines and put down the data which you have coread from the known overhead line:
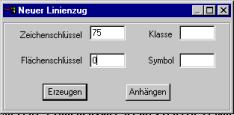
On generating the system expects your line. The terminator points of the line should be integrated precisely into the points of both roof stands:
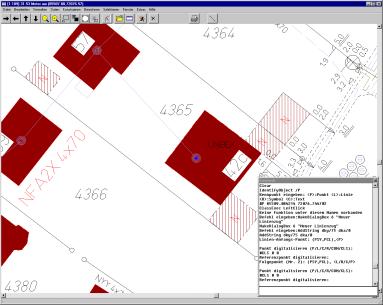
8. Click on ![]() . Now the system expects an authoritative point into which the new point should be integrated.
. Now the system expects an authoritative point into which the new point should be integrated.
9. Select the first roof stand with the left mouse key. A green triangle appears exactly on the roof stand and registers that there the starting point of a line is.
10. Click once more on ![]() . Now the system expects the second authoritative point.
. Now the system expects the second authoritative point.
11. Select the 2nd roof stand with the middle mouse key. A just line is thereby generated between both authoritative points.
12. Operate them RETURN- Key for finishing of the function.
Result:
Tip: With that STRG- You generate key and the left mouse key arcs, with OLD- Key Splines.
Shift from data
In the above representation is to be seen that the field part text "4365" lies now a little bit too near with the management. Hence, he should be shifted.
Working example 1:
1. Identify the text by click with the left mouse key.
2. Choose the menu point Daten|Verschieben|Element in.
3. Click the new position of the text.
Result:
The text is shifted. His identification mark remains first on the screen. As soon as you identify, however, the next object by mouse click, this mark from the announcement also disappears.
Extinguishing of data
In the private connection cable of the house 42c there stands the text "UNBEK". He should be extinguished.
Working example 1:
1. Click the object with the left mouse key. The object is emphasised with markers.
2. Choose the menu Daten|Löschen |Element from or
3. The whole object becomes red and there appears the inquiry

4. Confirm the extinguishing with Yes.
Result:
The text is extinguished. His identification mark remains first on the screen. As soon as you identify, however, other data by mouse click, the mark from the announcement also disappears.
Tip: You are able to do identification marks by the menu point View | Update remove.
Under the menu point Daten|Löschen |... you can remove all data types. You are able to do whole objects also by concurrent pressure of her STRG- and DELETEKey extinguish, elements with SHIFT- and DELETEKey.
Extinguished data are removed first only from the temporary field of work. If you do not protect the plan to (Datei|Sichern), change nothing in the permanent data continuance.