The switching of plans and the selection of objects or elements are for many treatment processes and analyses basic working steps.
Within the hierarchical structures all things, whether level, plans, objects or elements can be selected according to different criteria for the other treatment. With the first store of a plan he is selectable, released i.e. for the treatment. All objects contained in it and elements are selected and workable on with it.
Switching of levels and plans
If certain plans become often required only to the better spatial orientation on the screen. Hence, under the menu point Verwalten|Pläne|Schalten you can switch off single levels and her plans. Then the objects within these plans cannot be identified any more or be changed, appear only to the reference in the background. Under the menu point Verwalten|Pläne|Schalten you can switch on this also for the other treatment again.
Not selectable plans appear on the screen in grey colour.
Working example 1:
1. Select the menu point Verwalten|Pläne|Schalten: The dialogue box „plans switch“ appears. In her the Layer with all plans which were loaded in the first both working examples are performed.
2. With a double click on the yellow briefcase symbols you open the folders, so that you see now all loaded plans like in the following picture. All selectable plans are provided with a hook.
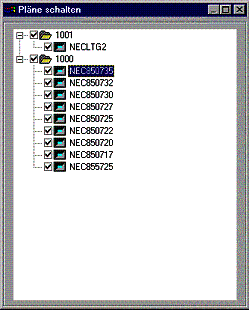
3. Remove by clicking all hooks from the controlling small boxes of the cadastral plans. Besides, the screen automatically switches in the full image view. and indicates the borders selectable of all plans. In the left lower edge the borderlines are called in each case with the plan name. With all selectable plans the borders are green up to the open plan which is shown with red plan borders. All plans which they switch off receive olive-green plan borders, and all objects of these plans are shown grey.
4. Close the dialogue box.
5. Remove the plan borders with clicking the menu point Fenster|Neuzeichnen.
Result:
Now all cadastral data are grey.
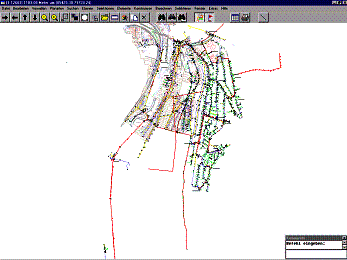
If you zoom now in the plan and click an object twice, receive only information about the nächstliegende object in the management plan. The objects of the cadastral plan cannot be identified any more.
Tip: With the turning on of plans is automatically opened that plan which has been switched on in the box as latter. They can open, instead, also, e.g., the management plan, while you click in the dialogue window on the rectangular, light blue button between the controlling small box and his plan name.
Select from objects after name
Within switched on plans all objects are selected first. Now, however, it should be worked on only objects from certain categories.
Working example 1:
1. Select the menu point Selektieren|Nach Name: The dialogue box „objects select“ appears. She contains a list structure with all defined object names.
2. With a double click on the briefcase symbol you open the uppermost list.
3. Eight other folders appear which are named after the different object classes. On this occasion, means
HA_: Private connection,
NSP_: Low-voltage
AL_: Universal
MSP_: Middle tension
StK_: Tax cable
KA_: Land register
SB_: Road lighting
TOPO_: Topography
4. Open some of the folders to recognise the structural arrangement of the objects. In the following dialogue box the folder NSP – low-voltage – is opened. In it there are both object superclasses "sleeve" and "cables" in which five or three different object classes lie again. At the beginning all controlling small boxes are grey puts under. With an easy click on a controlling small box you remove first the grey shading. Afterwards the second click on the controlling small box activates the selection of the desired object class. A grey small box means either "partially selected" or "selection status not famously".
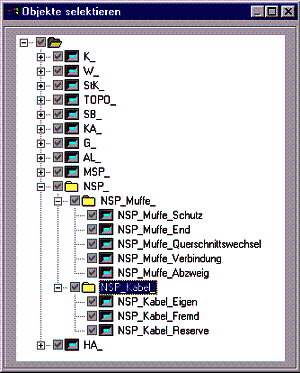
5. Click on the controlling small box in the uppermost briefcase symbol. With it you exclude first all objects from the selection.
6. Select under NSP_Kabel_Eigen all own low-voltage cables, while you activate the accompanying controlling small box.
7. Close the dialogue box.
Result:
Only the selected objects appear in full colour, all the other objects are dyed pale. They can reach only the selected objects with the mouse. On the selection amount can be gone on working.
For example, you can provide in this manner a plan expression, in the certain, important dates hergehoben are.
Tip: For the fuss of a selection you must not open only the dialogue box. Simply select the menu point Selektieren|Alles.
Tip: The objects which do not correspond to the data model, own, e.g., because them a not defined object key or sign key which do not fit to the agreed object class are not influenced by this function.
Select within a surface
Beside objects from certain classes or with certain attributes if you can also select objects within a certain surface. The function selects all objects which lie completely within the surface.
Working example 1:
1. Lift first the selection from the preceding example by clicking the menu point Selektieren|Alles.
2. Select the menu point Selektieren|Fläche.
3. Click with the mouse on the screen the corner points of the area which you would like to select. They can form any polygon. With the second and every other corner point Moskito draws the accompanying edge line.
4. If you have come again in the starting point, press them RETURN- Key. The surface is closed. A dialogue box with the question „polygon in order?“ appears.
5. Confirm with. The box still appears the second spot. Confirm again.
Tip: By input of the function SLA in the command line you can also select objects which lie beyond a given surface which cut an area or also carry out combinations of these selections. Check in addition please in the authoritative manual Functions under SLA (for Select area).
Result:
Only the selected objects appear in full colour, all the other objects are dyed pale. They can reach only the selected objects with the mouse. Now the selection amount can be processed further.
Select after attributes
They can select objects which own certain attributes or attribute values.
Working example 8:
1. Retain the selection from the preceding example.
2. Select the menu point Selektieren|Attribute|Nach Value. A dialogue box appears.
3. Give as an attribute value „AL 4x70“.
4. á####
Result:
All own low-voltage cables with the cross section AL are selected 4x70. By the preceding selection the attribute selection accesses only the object class „own low-voltage cables“. In this case all the other cables which show the same cross section remain untouched.